A roundup of my favorite tips & tricks for building a fun and colorful gallery wall, from selecting art to perfect placement!
Gallery walls are my go-to when I want to add personality and color to our house. They are such a fun way to transform a blank wall into one full of life and character.
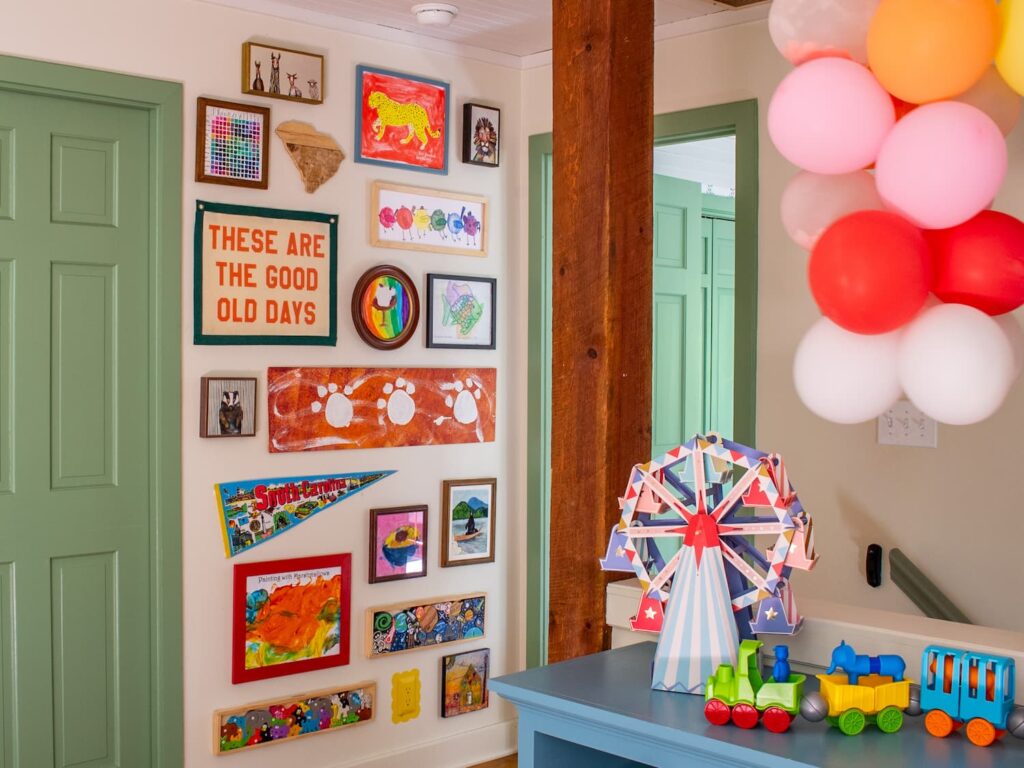
While some prefer a matchy-matchy gallery wall (similar art pieces, the same frames, etc.), I prefer to lean into a bit of chaos. Nothing matches and therefore everything matches.
Forget stuffy rules and perfectly matched frames – let’s create an eye-catching display that reflects you and brings a bit of joy & happiness into your home.
making a joy-filled wall of art
Building a fun and colorful gallery wall might seem daunting, but with a few tricks and techniques, you can transform your space into a joy-filled wall. Here’s your guide for just that!
Selecting Your Art & Frames

Lean into color
The key to a colorful gallery wall is, well, color! The more the merrier is my rule for colors. While harmony is nice, a touch of playful clashing can add real personality.
You can either go with the rainbow like I did for the playroom gallery wall shown, or work off a color palette if you want to rein things in a bit.
And don’t overlook the frames! They are a great place to add color and have fun. Plus, you can easily bring life back to an affordable thrift shop frame with just a splash of paint.
My favorite way to add color to a boring frame: sample pots of paint from Farrow & Ball. Their sample pots are made with a real paint formula and are shipped pretty quickly (& for free!)
Let’s keep the frame conversation going…
Vary the frame styles, materials, and colors
Matchy-matchy is overrated. No, really. Don’t feel confined to using one type (or size! or color!) of frame.
Experiment with different materials like metal (gold, silver, brass), natural wood tones (light oak, dark walnut), painted wood, and even frameless options like canvases and pennants.
Play With Scale
Another trick for a visually appealing gallery wall? Variety in size! Plan to have a few bigger pieces anchor the wall, and several smaller prints and photos to fill in the space.

Make It Special
Honestly, when you’re picking art for a gallery wall, go with what you love and what tells your story.
You know, like that painting your grandmother gave you, that print from a vacation, a postcard from a pal, and even (especially!) artwork done by a super cool kid. That’s what makes your wall feel like you.
Collect several pieces that make you smile, and chances are they’ll probably look pretty good together.
Add Something Unexpected
If you want a truly fun gallery wall, incorporate an element or two that go beyond traditional framed art. My unique add for the playroom wall: wooden puzzles hung with Command Strips. Actually, I used Command Strips to hang every piece because it’s just so easy.
For a bit of extra whimsy, I painted a border around the wall outlet switch. I switched out the plain cover for a paintable outlet cover and gave it a scalloped edge. The color I used is Farrow & Ball Babouche.
Another unique & unexpected idea I had for this wall was a classic Felix the Cat clock. Did you know they come in several different colorways!? Here’s a fun pink one! It felt a bit too much for our playroom, but please let me know if you add one to a gallery wall in your house. I think it’s clever!
Arranging The Gallery Wall
Now that we know how to select pieces for a fun gallery wall, let’s chat about how to arrange and hang them for that perfectly styled yet collected-over-time feel.

Start With the Big Pieces
After I’ve got my hands on everything that could go on the wall, the floor becomes my workspace. I generally start by laying out the big pieces first, trying to balance them out across the space.
Don’t Stick To A Grid
After you have a general idea of the shape and where the bigger pieces are going, let the rest of the gallery wall grow around it in a more organic, free-flowing way. This is why variety in size is important!
Maybe some pieces are closer together, others have a bit more breathing room – it’s all about what feels good to your eye. Have a strong foundation and then sprinkle in a bit of happy chaos. Even though we are planning it out, the goal is a collected-over-time feel.
Mock it up first
While I enjoy spontaneous decorating, gallery walls – particularly in non-standard spaces like stairwells – demand a more thoughtful approach. This isn’t a type of project I’d ever just ‘wing’.
I always use paper to arrange the pieces on the wall until placement is just right. To do this, trace the outlines of the frames onto paper. Cut them out and use painter’s tape to arrange them on your wall until you find a composition you love. Paper grocery bags are perfect for this!
Time For Install
Once you feel pretty good about the paper placement, it’s time to hang your art! I always use Command Strips for this because they are just so easy. Plus, they don’t leave holes in your wall if you change things around one day.
When you’re ready to hang, just remove the paper placeholder (one at a time!) and pop in the real deal. This is the quickest part of the whole process if you use Command Strips.


