We are so excited to share a guide to our DIY painted arch on wall. This was a surprisingly easy DIY project that turned a boring, underused wall into a fun space in the playroom.
It’s also a pretty quick project. The only ‘long’ part of the project is the drying time between coats. But it’s definitely one you can complete in a day. If you are planning to hang shelves, plan on two days.
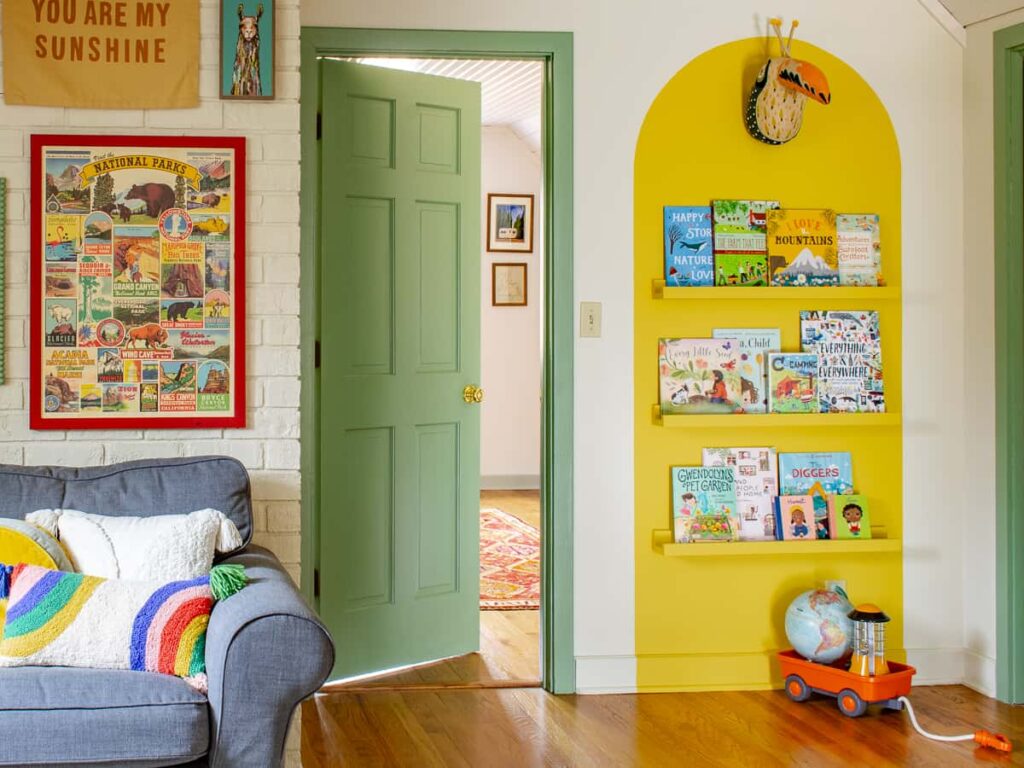
The arch wall can serve as a background for so many great pieces, from art that you want to showcase, a backdrop for furniture or even bookshelves. We went with the bookshelf route since ours is in the playroom and we have too many books!
Now, onto our step-by-step guide to an easy DIY painted arch wall. Before we get into the steps, let’s first chat about the supplies needed.
Supplies Needed for your DIY Painted Arch on Wall
- Pencil
- String
- Nail or push pin
- Painters tape
- Angle paint brush
- Paint roller frame
- Paint roller cover
- Paint trays (you’ll want a metal tray and plastic disposable trays)
- Paint
- Paint stirrer
Steps to a DIY painted arch on wall
Step 1: Determine the dimensions for your arch
First up, figure out how wide and tall you want your accent wall. For ours, we had a defined area between a doorway and another wall. We sized it to match the doorway, but yours may be different.
If you are looking for ideas, check out our roundup of painted arch inspiration here.
When you go to measure, you’ll want to know how tall and wide the accent wall will be, and where on the wall the arch will start.
Step 2: Tape off the sides
Mark off the edges with a pencil and then use painter’s tape to tape the full line down on each side. This will keep the sides of the arch straight.
It’s much easier to use tape than trying to use a pencil and ruler to get it straight. You can also remove and reapply if some of your tape is angled.
Another bonus for the tape is that you’ll have an easy line to paint over when you get to that step. Otherwise, you’d have to hope your paint skills are good enough to make a straight line. Mine definitely aren’t!
As far as the length of tape goes, I tend to use smaller pieces of tape rather than a full height one. This somehow seems easier for me, but you could definitely tape the whole side with one long piece if that sounds better to you.

Step 3: Map out where the arch will land
I have broken up the next part of the project into two steps to make it less confusing. Basically, at the end of step 4 you will have drawn out a perfect arch. But first– let’s get some measurements!
First, find the middle of your arch. To do this, measure the distance between your two taped sides and mark the center point. You’ll want to do this at the top of your straight lines, where the curve for the arch will start.
Use a tape measure to get the distance between one side and the center of your arch. You’ll need it for the next step! This is your radius.
Step 4: Draw out the top of the arch
This step may sound stressful, but it’s not! It’s actually pretty straightforward once you see where it’s going.
First, grab your string and tie one end around a pencil. This will be used to mark out the arch part of your wall.
You’ll then want to cut the string to match the radius you previously measured. It’s the distance between your center line and one of the edges. For example, if your accent wall will be 40 inches wide, your string from the pencil should be 20 inches.
Using a nail or piece of tape, affix the loose end of the string where you previously marked the center.

Next, starting at one of the sides of your arched wall, use the pencil to draw a semi-circle from one side to the other. The string will keep the distance the same while you work your way around.
Make sure to watch the angle of your pencil, though. Just take your time and you’ll have an arch layed out on the wall in no time.
One last piece of advice on this: don’t press down too hard because pencil lines will show, especially if you are working with lighter-colored paint.
I decided my lines were too dark after drawing out the arch, so I went back with an eraser to lighten them up. This worked great and I could still see the arch layout when I went to paint it.
Step 5: Paint the sides
Use a small paintbrush to paint over the tape. Make sure to brush inward toward the arch from the middle of the tape. This will ensure the paint doesn’t get under your tape.
If you brush the opposite way (from the inside out), there is a higher chance paint will work its way under the tape.
Plan to paint a few inches in so that you can easily roll the remainder of the accent wall when done.

Step 6: Paint the arch on Your Wall
Next, you’ll work your way up and around the arch. This part of the project takes a bit of patience, but you can do it! Just start slowly and do a little bit at a time.
Don’t worry if it’s not perfect. It will look better far away than up close. I was amazed at how much better mine looked when I took a step back.
Just paint a few inches in— enough to where a paint roller will cover the rest. You can see this in the photo of the arch in progress.

Step 7: Paint the inside of the arch
Use a paint roller to roll the inside of the arch. This is the fun (and quick!) part. Remove your tape immediately to prevent the freshly painted wall from peeling.
Add a second coat of paint after the first dries. It’s much easier than the first time you painted the arch because there are lines to go over. I never use painter’s tape for my second coat. and just follow the lines around instead.

Step 8: Admire your work
Once the paint dries, you are good to go! You can either leave the arch wall as-is with some furniture in front of it, add some art or make it a bookshelf wall like we did.


Can you share where the cute bird head sculpture came from?
Hi there! It’s from Crate & Barrel (curious toucan animal head wall decor) but I don’t see it in stock anymore 🙁 Etsy has some fun animal wall decor if the Crate & Barrel one doesn’t come back in stock.
Love this idea. Going to do it in one of my grand kids room. Where did you get the bird head mounted at the top of the book shelves! Thank you
Hi there! It’s from Crate & Barrel (curious toucan animal head wall decor) but I don’t see it in stock anymore 🙁 Etsy has some fun animal wall decor if the Crate & Barrel one doesn’t come back in stock.