A DIY tutorial for making your own bobbin frame, including supplies needed, expected costs and step-by-step directions.
I love the look of bobbin frames (you know, the cute frames with a beaded border!) but I’m not a fan of the price tags associated. Especially for larger frames. And I didn’t have the budget for an expensive frame for our playroom gallery wall.
After browsing around local shops, Amazon, Etsy, etc. for the perfect bobbin frame, I finally decided it was something I would just do myself. I had a ton of supplies on hand already, so I purchased a 16×20 frame, half wooden beads and glue and got to work.
It turns out making a bobbin frame is actually a quick and easy DIY project.
I didn’t run into any issues along the way and I loved that I could pause between each of the steps. Well, they are kind of forced pauses because you need to wait for things to dry (glue, primer, paint…). But it’s great because you can put the project on hold and come back to it when you have time.

As far as how the frame turned out, it’s perfect! It made our colorful playroom even happier. And I have an extra frame + beads, so I’m already thinking about where else I’ll put a bobbin frame around the house.
I love easy DIY projects and wanted to share the steps for this bobbin frame in the hopes that it may inspire someone else to make one, too.
Article Overview
This article outlines all of the steps to make a bobbin frame at home. It shares supplies needed, what to consider when sourcing these supplies and step-by-step instructions to completing the project. It also shares costs, both for a version you may find online and for a DIY one.
Supplies Needed for a DIY Bobbin Frame
- Picture frame (I used this 16×20 frame– it’s a 2 pack)
- Half wooden beads (see notes below on the right size)
- Glue (see notes below on type)
- Paint brush for glue (specifically if you are using 2 part epoxy)
- Primer
- Paint
- Paint brushes
- Spray polyurethane (if you want a lacquered look)
Additional details on supplies
A note about half wooden beads
There are several sizes available for half wooden beads, so you’ll want to make sure you get the right ones for your frame. You can
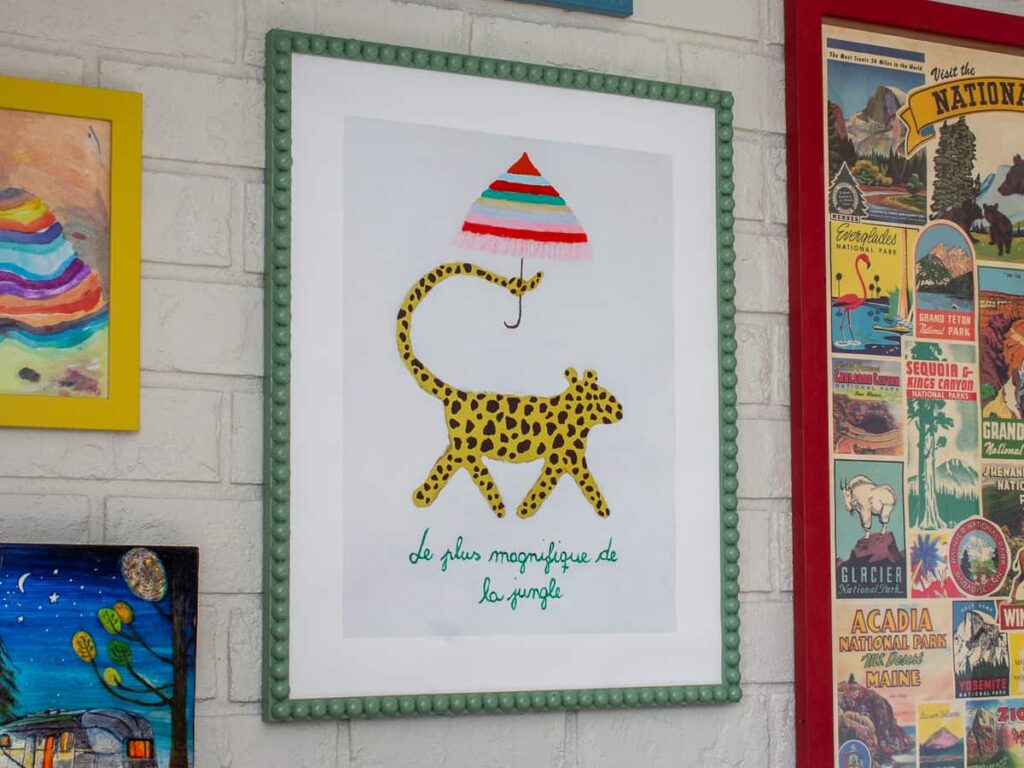
For the project pictured, I used this 16×20 frame and two bags of these half wooden beads.
I used the 15mm ones for this project, but you’ll want to make sure you get the right size for your specific frame.
This is the leopard print and I got it in the 16×20 size, though there’s also a smaller 11×14 one and a larger 28×36 print. You can save 15% off of your first purchase at Artfully Walls. I got my print during their Black Friday sale and got 30% off. It was worth the wait!
A note about glue for the bobbin frame project
You’ll want to base the type of glue that you use on your specific frame material. While hot glue works on a variety of materials, I didn’t use it because I find that hot glue doesn’t last as long as
I used Gorilla Glue 2 Part Epoxy because the frame is plastic and the beads are wooden. I wanted to make sure that whatever we used worked with both materials. You could use plain wood glue if your frame is wooden, but you wouldn’t want to use that on plastic.
How much does a DIY bobbin frame cost?
If you were to buy a handmade bobbin frame off Etsy you’d easily spend over $40 for a small frame (like a 4×6”.) And much more for a larger one! Over $100 for sure.
You’ll occasionally see bobbin frames in shops like Target or Michael’s, but from my experience it’s tough finding the actual size you need.
If you have a square print in mind, check out this beaded frame in gold from Target. They have it in both a 5×5” ($9) and 8×8” ($10.). I actually primed and painted the larger size for our playroom gallery wall. The frames feel a bit cheap but once they are up it doesn’t really matter. If you need a specific size frame, though, then these probably won’t work for you!
So, let’s chat about the cost for this DIY version.
If you have already done some DIYs then you may have a lot of these supplies laying around. I had most on hand except for the frame, wooden beads and glue. Hopefully that’s the case for you, too!
The beads were just under $10 per pack, the glue is around $6 and the frames are $30 for two. My total cost was $46 for two frames ($23 each.)
Now, you can find super affordable frames at thrift stores, Goodwill, etc. I do this often and just replace the art with something more my style. This will definitely keep your cost down. Your cost will also be lower if you use a smaller frame, like an 8×10 Amazon Basics frame.
Hopefully you already have some paint, primer and paint brushes around. If not, plan on spending about $30 for all of this. However, you’ll only use a little bit of paint and primer so you’ll definitely have some left for future projects.
How to make a DIY Bobbin Frame
And now for the tutorial! It’s a bit lengthy because I wanted to cover every detail to make sure your project is successful.
Step 1. Gather your supplies and prep a work surface
You won’t need your paint yet, but go ahead and grab your frame, beads, glue and a paint brush for gluing if you are using one. Set everything out on a protected work surface. I typically use a flat cardboard box for this. We have plenty of those lying around!
Step 2. Test the layout
Before you get to gluing, you’ll first want to test out how the wooden beads will fit on the frame. This will prevent any issues when you are in the middle of gluing– like realizing your beads don’t quite fit! You should be able to add a little bit of space between each if you find that your beads are falling either a bit too short.
For the 16×20 frame I used 35 15mm beads on the long side and 27 on the short side.
Step 3. Glue the wooden beads
The next step is to glue the wooden beads on the frame. It’s as easy as it sounds!
If you are using 2 part epoxy or another glue that needs mixing or some sort of preparation first, you’ll want to start there. But once the glue is ready you can get to work!
Start with one side and glue all the way across before going to the next. Unless you are using glue that dries pretty quickly (ex. Superglue or hot glue), you’ll be able to move the beads around a bit after placing them.
I did this with each side after getting all of the beads on there. This allowed me to space them out correctly so that the beads went perfectly from end to end. It took about 5 minutes per side to glue and straighten as needed.
If using 2 part epoxy, plan to mix a new batch of glue for each side. The kind I used started to dry after 5 minutes and you could really tell the difference between fresh glue and ‘old’ glue. I’d use about a quarter-size amount for each batch and had plenty left in the package after the project was complete.
Let the glue dry completely before going to the next step.
Step 4: Prime the frame
After the glue is dry and your beads are set, put a coat of primer on the frame.
We just used a regular paint brush for this but ideally you would use a paint sprayer. Not only are paint sprayers super fast, but they also don’t leave any brush strokes.
Step 5: Paint the frame
Once your primer dries you’ll want to put two to three coats of paint on the frame. Allow for drying time between each coat.
I used Farrow & Ball’s Breakfast Room Green for this project. We used it in the playroom so I already had an open can. However, I have purchased several of their small sample cans for other projects like this. Their samples are the Estate Emulsion version of their paint and are $8.50 each.
I have found that other paint companies (like Sherwin Williams) don’t give you their actual paint in samples. Instead they sell ‘sample’ paint that doesn’t have the staying power of their regular version. I love that I can get a mini pot of a great Farrow and Ball color for a small project like this DIY bobbin frame.
You could also use spray paint on the bobbin frame, but I liked the idea of choosing the exact color I wanted and not just what was available in spray format.
Step 6: Spray polyurethane for a shiny look (optional)
If you want a lacquered bobbin frame, add a coat or two of spray polyurethane on it after your paint dries. I didn’t do this for ours because I love the matte look of Farrow and Ball paint. But spray poly can also make it look great! This is typically what you see if buying one off of Etsy.
Step 7: Add your art and hang
After the paint dries you are ready to hang your new bobbin frame! Just add your art and pick a great place to hang it. I get so proud when I see mine and hope the same for you!


Hi! I was wondering what the width of the surface of the frame is? Is it also 15mm? I was going to try this on a smaller frame and wondered if your half beads go to the edge of the frame or if they are shy of the edge. Thanks!
Hi Erin! The beads on this frame are pretty much the exact size as the frame’s face BUT I have done it other places where the beads are smaller and it’s really no issue! I say go for it!! 🙂